
· 7 min read

The WebdriverIO framework is a versatile tool that offers a lot of features for you to play around with. The goal of our project documentation is to communicate these features well and give you an understanding, on how they could be applied in your project. A central contributor to this are code examples. Many times they can convey the principle idea of a feature like a picture that is worth a thousand words.

It is not a surprise that many projects out there have code examples embedded in their project documentation. Many of them are even interactive and allow users to fiddle around with the code in real time, e.g. the new React Docs, or provide "playgrounds" with live examples, like on svelte.dev.

Live Examples on the new React docs

Live Examples on the new React docs


When it comes to having code examples on a documentation page, a common problem that arises with them is that examples:

  • are made up and often don't reflect reality
  • contain errors because we are all just humans
  • are getting outdated as interfaces change
  • can be difficult to apply in your own project

As an attempt to improve our code examples on this project page we started to roll out some changes to the documentation that hopefully addresses these issues:

queryElements/singleElements.js
loading...

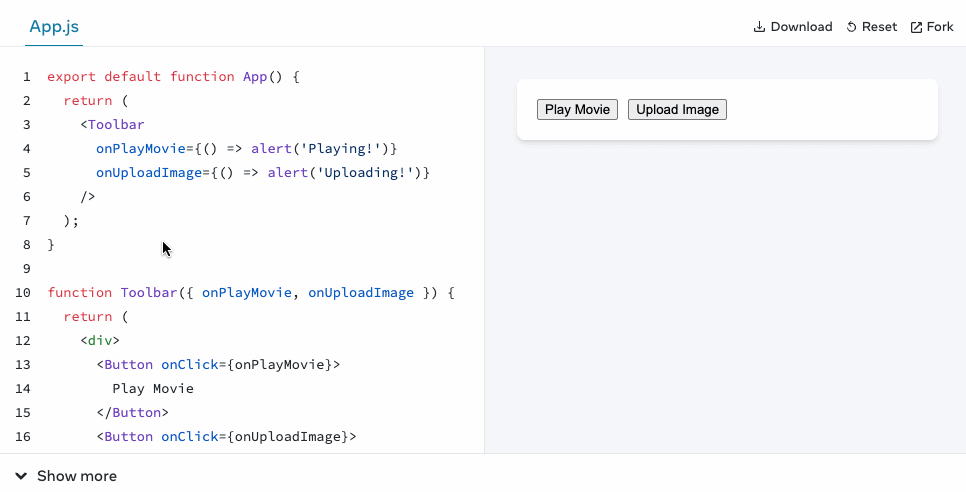
As you can see, some examples now have two buttons that allow you to run them or view them on GitHub. But what does that mean?

Extract Examples from Docs

As a first step we started to remove all code examples from our documentation page and moved them into a dedicated repository. This allows us to treat these examples as code and set-up the necessary infrastructure, e.g. CI/CD or automated dependency updates, to ensure quality and correctness.

So say hello 👋 to this new repository in our organization that now contains a lot of examples that we re-use on this website.

"webdriverio/example-recipes" repository

webdriverio/example-recipes


You can see that every example is self contained in its own directory to keep everything very simple. A big list of NPM scripts allows you to run specific examples with just a single command.

In order to embed the examples back into the website, we are using a plugin for Docusaurus that downloads the code based on a simple GitHub reference link. So instead of having code within our markdown files, we just reference the location on Github, e.g.:

setup/testrunner.js
loading...

The plugin then downloads the code and only shows provided code lines of that file. Here is the final result of that:

setup/testrunner.js
loading...

If you are using a different tool for building your static docs, chances are that it has similar plugins available to just do that.

Testing Examples

Now that we have everything nicely encapsulated into a dedicated repository, we can use CI/CD to test all examples on regular basis. A simple GitHub workflow can trigger the execution of these examples and have the pipeline fail if any of them have an error:

name: Test
on: [push, pull_request]
jobs:
test:
runs-on: ubuntu-latest
strategy:
matrix:
exampleDir:
- click
# more example directories here
# ...
- api/webdriver
steps:
- name: Checkout
uses: actions/checkout@v3
- uses: actions/setup-node@v3
with:
node-version: 18
- name: Install
run: npm install
- name: Test
run: npm run ${{ matrix.exampleDir }}
working-directory: ${{ matrix.exampleDir }}

Most of the examples are written as normal WebdriverIO test files and contain normal assertions like any other test would do, e.g. an example that shows how to fetch elements using command chaining would be written as following:

it('should get the text of a menu link', async () => {
const menu$ = await $('#menu') // or `browser.$('#menu')`
console.log(await menu$.$$('li')[2].$('a').getText()) // outputs: "API"

await expect(menu$.$$('li')[2].$('a')).toHaveText('API')
})

With the ability to reference certain code lines we can just strip out the testing part of the example and focus on what's important:

queryElements/singleElements.js
loading...

Keep Examples up to Date

Another advantage of having a CI/CD infrastructure is the ability to use workflows that ensure everything stays up to date. Since WebdriverIO code is hosted on GitHub, we setup Dependabot to update all dependencies on weekly basis. An additional GitHub workflow helps us to auto-merge these dependency updates so that we only need to deal with them in case they cause issues due to failing tests.

This process is very important and helps us to ensure that changes in WebdriverIO don't break any of our examples we use in our documentation. It is also a great additional feedback loop and creates more confidence when a new version is released that did not break any of our examples.

Make Examples Easy Accessible

Lastly, to make every example very easy to access and run, we are using a feature of a very cool VS Code Extension called Runme that helps to check out code locally with a simple click on a button. If you haven't installed Runme yet, go check it out on the VS Code Marketplace or find it in your VS Code:

Runme on the VS Code Marketplace

Runme on the VS Code Marketplace


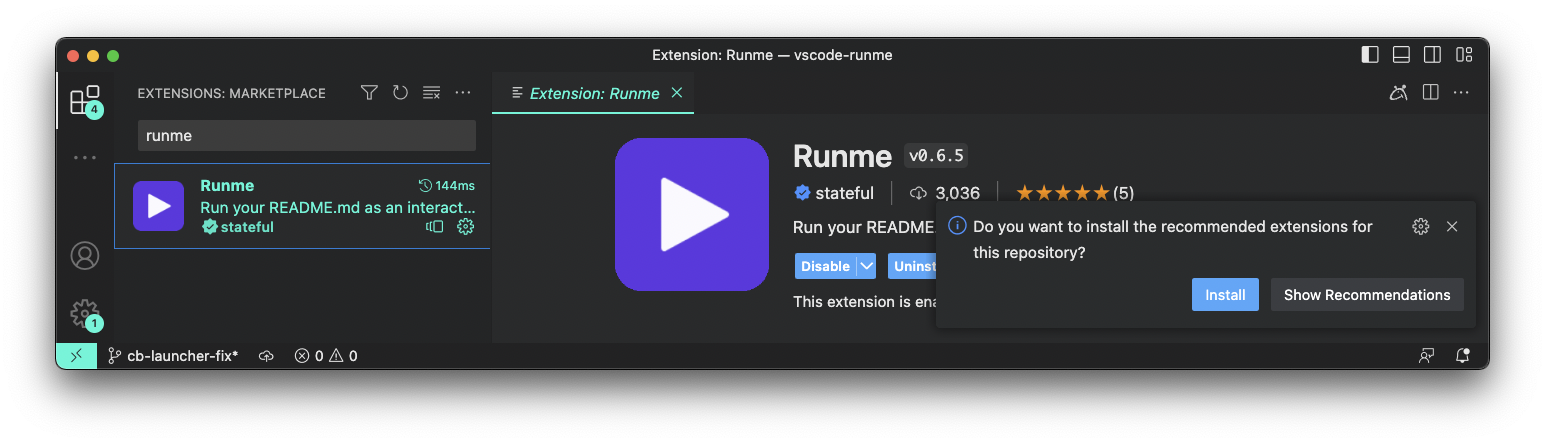
Many surveys have shown that VS Code is the dominant IDE for many developers around the world. With the Run Example button we allow all these users to access the repository with a single click. The button is a simple link with a custom vscode:// protocol that will prompt you for permission to open it in VS Code. There, the extension will pick up the link information containing which repository it needs to check out and which markdown file to open. If the extension is not installed, it will automatically do that for you, if you consent.

Run Example with Runme

Run Example with Runme


Once the repository is checked out, Runme will open a dedicated README.md for the example in an interactive notebook experience. It will explain the example and walks you through it. It allows to execute the code cells within the VS Code terminal securely so that setting up and running the example is done with a simple click and requires no additional application to be opened.

For folks that don't have VS Code installed can still access the repository, check it out manually and run the examples as well.

Get Involved

WebdriverIO has many examples and a lot of commands and APIs to document. This is a great opportunity for you to get involved and contribute to the project by:

Feel free to also raise an issue if you have any questions or feedback.

I think this is a very cool way to provide an interactive and simple way to provide code examples for a framework that requires a specific environment that is not a browser, e.g. Node.js. If you are a framework author and run your docs with Docusaurus, feel free to copy this approach if you like it. It's Open Source and free.

Thanks for reading!

· 10 min read

While it took a bit longer than expected the WebdriverIO team is excited to announce that we finally released v8 today! 🎉 🎉 🎉

As with almost all of the last major updates we again had to touch every single file of the project. This time our major goal for the new version was to finally transition from CommonJS to ESM which enables us to continue with important dependency updates and avoid security issues. Furthermore, we cleaned up some technical debt, e.g. removed all code related to synchronous command execution which was deprecated last year, as well as implemented a new Action API interface and streamlined the way WebdriverIO deals with global objects using the test runner.

In this blog post, we go through every important change and explain what you need to do to upgrade to v8. Spoiler alert: in most cases no updates to your tests are necessary 😉

Drop Node.js v12, v13 and v14 Support

We've dropped support for Node v12 and v14, latter was moved into a maintenance LTS phase by the Node.js team in October 2021. While it is technically fine to continue using Node.js v14, we don't see a reason why you shouldn't update to Node.js v16 or ideally v18 directly.

To update Node.js, it is important to know how it was installed in the first place. If you are in a Docker environment, you can just upgrade the base image like:

- FROM mhart/alpine-node:14
+ FROM mhart/alpine-node:18

We recommend using NVM (Node Version Manager) to install and manage Node.js versions. You can find a detailed description of how to install NVM and update Node in their project readme.

CommonJS to ESM Transition

The transition to the new module system has been the biggest chunk of work related to this release. It required us to update all module imports, transitioning from Jest to Vitest as a unit test framework and rewrite various parts within the code base. While this affected every single file it "should" be unrecognizable to you. If your project still uses CommonJS, WebdriverIO will work just fine as both module systems continue to be supported. This is also the case when using webdriver, devtools or webdriverio as a module.

If you have been using Babel only to use import statements in your tests, you can remove the integration as this is now supported by ESM natively. If you like to continue using CommonJS and require, that is fine too, no changes are needed to update to v8.

A new Runner for Unit and Component Testing in the Browser

If it comes to one feature we are really excited about in this release it is the new browser runner 🙌 I've been writing and testing a lot of web components in this past year and was always frustrated about the fact that they would be tested against JSDOM rather than an actual browser. JSDOM is a re-implementation of many Web APIs in Node.js and is a great tool for simple testing but it doesn't replace an actual DOM implementation within a browser. Especially using JSDOM for component testing has various disadvantages compared to running tests in the browser.

Furthermore running component tests through WebdriverIO allows to use the WebdriverIO API seamlessly and enables real user interaction with your components through the WebDriver protocol. This makes those interactions more realistic compared to emitting them through JavaScript. It comes also with 1st class support for popular utility frameworks such as Testing Library and allows to use both APIs interchangeably. Check out how you can use Testing Library for rendering and fetching elements while using WebdriverIO for interacting with the component:

vue.test.ts
import { $, expect } from '@wdio/globals'
import { render } from '@testing-library/vue'
import Component from './components/Component.vue'

describe('Vue Component Testing', () => {
it('increments value on click', async () => {
// The render method returns a collection of utilities to query your component.
const { getByText } = render(Component)

// getByText returns the first matching node for the provided text, and
// throws an error if no elements match or if more than one match is found.
getByText('Times clicked: 0')

const button = await $(getByText('increment'))

// Dispatch a native click event to our button element.
await button.click()

getByText('Times clicked: 2') // assert with Testing Library
await expect($('p=Times clicked: 2')).toExist() // assert with WebdriverIO
})
})

The new browser runner allows you to load and execute tests within the browser rather than in Node.js. This allows you to access all Web APIs to render web components or to run unit tests for your frontend modules. Under the hood it uses Vite to load all dependencies and make the integration seamless.

If you have been using Karma for running unit tests in the browser you can switch over to WebdriverIO which provides the same capabilities but offers better support and integration to other services and reporters. It also seems that the Karma project is not much maintained these days and has unresovled security vulnerabilities.

New Action Interface

For many years users that liked to run more complex interactions on their applications using WebDriver's actions API had to know many details about the command to construct the correct payload. With v8 of WebdriverIO, we now ship a new interface that makes executing various actions much easier.

With two new browser commands: action and actions, it is now much simpler and type-safe to run the right action, e.g. sending key events to the browser:

await browser.action('key')
.down('f').up('f')
.down('o').up('o')
.down('o').up('o')
.perform()

Read more on the new action interface in the WebdriverIO API.

WebDriver BiDi Support

A strong argument to use WebdriverIO as opposed to other tools is the fact that it is based on the WebDriver protocol, which is a web standard for automating browsers. It guarantees the ability to run tests in browsers that are used by your users as opposed to a browser engine, which can be very different from a feature and security aspect. The W3C Working Group has been working on a new version of the protocol that will enable better introspection capabilities and new automation primitives.

With this release, users can start accessing these new protocol features as they become available in browsers. Over time more commands will transition to the new protocol under the hood while the interface remains the same. We are all very excited about the new capabilities and opportunities this protocol will provide, e.g. listening to log events while running tests, e.g.:

await browser.send({
method: 'session.subscribe',
params: { events: ['log.entryAdded'] }
})

/**
* returns:
* {
* "method":"log.entryAdded",
* "params":{
* "type":"console",
* "method":"log",
* "realm":null,
* "args":[
* {
* "type":"string",
* "value":"Hello Bidi"
* }
* ],
* "level":"info",
* "text":"Hello Bidi",
* "timestamp":1657282076037
* }
* }
*/
browser.on('message', (data) => console.log('received %s', data))

/**
* trigger listener
*/
await browser.execute(() => console.log("Hello Bidi"))

We are following and supporting the development of all browser vendors to ensure new features are working as expected and can be used through a lean user interface. For more information on this topic check out my talk on The Evolution of Browser Automation.

Optional Globals

When using the WebdriverIO test runner it would usually register the browser object or the $ and $$ command to the global scope as these are usually often used when writing tests. However, attaching objects to the global scope is not seen as best practice and can cause side effects when other modules decide to do the same. Therefore with v8, it is now up to the user whether they like to continue attaching these objects and methods to the global scope or prefer importing them directly, via:

import { browser, $, $$, expect } from '@wdio/globals'

A new configuration property called injectGlobals (defaults: true) handles whether the test runner modifies the global scope or not. If your setup works fine using global objects, no change is needed to update to v8. However, we recommend importing WebdriverIO-related interfaces directly to ensure no side effects can happen.

Note: If you are using TypeScript, updates to the tsconfig.json are necessary to reflect changes made to the location of the WebdriverIO types. These are now part of the @wdio/globals package:

{
"compilerOptions": {
"types": [
"node",
- "webdriverio/async"
+ "@wdio/globals/types"
]
}
}

Miscellaneous

Aside from these major updates, the team has spent time improving the documentation and introduced new API docs around WebdriverIO objects like browser, element and mock. Furthermore, we removed the config property from the browser object. If you have been using it to access data from the WDIO config, we suggest replacing it with options, e.g.:

- browser.config.hostname
+ browser.options.hostname

Furthermore did we fix the behavior of relative spec or exclude paths. Before v8 every path within specs, exclude or --spec was always seen relative from the users working directory. This behavior was confusing especially when the wdio.conf.js was not within the root of you project. This got fixed now so that specs and exclude path will be always seen as relative to the config file and --spec arguments, relative from the working directory.

Lastly, we had to remove support for tsconfig-paths as we haven't found a way to get it working within an ESM context. We believe this integration hasn't been used much anyway and a lot of it is nowadays natively supported in TypeScript. Let us know if this assumption is wrong and you would like to see it being supported again.

What's Next?

The WebdriverIO team is very excited about this release as it frees up time to start working on some new cool features we put on the roadmap. For many months we have been working secretly on a VS Code Extension that makes authoring and debugging tests much easier. Aside from that, there is always plenty more work to do and opportunities to explore to make this project better. We are welcoming and supporting everyone who likes to join us.

Lastly, I would like to say thank you to everyone who supports the project. Not only the folks who contribute financially through Open Collective or Tidelift but also everyone who contributes code, ideas, reports issues or supports folks in our support chat, occasionally or on regular basis. Without contributions from the community, this project can't go anywhere. Aside from many alternative projects WebdriverIO is not funded, nor driven by any corporate interest and stays 100% community governed. No lack of funding or need for capital gains will have an impact on this project. It has been like this since its inception more than 10 years ago and will continue to be like this for many many more years. Therefore we are always looking for interested folks who like to help us hack on the project. If you haven't, join our Open Office Hours and consider giving back to the project.

I am looking forward to more years and great features ahead. Thanks for reading!

· 3 min read

Fetching elements within e2e tests can sometimes be very hard. Complex CSS paths or arbitrary test ids make them either less readable or prone to failures. The disappointment we experience when our test fail is by far not comparable to a the bad experience people have when they need to use assistent devices like screen readers on applications build without accessibility in mind.

With the accessibility selector introduced in version v7.24.0 WebdriverIO now provides a powerful way to fetch various of elements containing a certain accessibility name. Rather than applying arbitrary data-testId properties to elements which won't be recognised by assistent devices, developers or QA engineers can now either apply a correct accessibility name to the element themselves or ask the development team to improve the accessibility so that writing tests becomes easier.

WebdriverIO internally uses a chain of xPath selector conditions to fetch the correct element. While the framework has no access to the accessibility tree of the browser, it can only guess the correct name here. As accessibility names are computed based on author supplied names and content names, WebdriverIO fetches an element based in a certain order:

  1. First we try to find an element that has an aria-labelledBy or aria-describedBy property pointing to an element containing a valid id, e.g.:
    <h2 id="social">Social Media</h2>
    <nav aria-labelledBy="social">...</nav>
    So we can fetch a certain link within our navigation via:
    await $('aria/Social Media').$('a=API').click()
  2. Then we look for elements with a certain aria-label, e.g.:
    <button aria-label="close button">X</button>
    Rather than using X to fetch the element or applying a test id property we can just do:
    await $('aria/close button').click()
  3. Well defined HTML forms provide a label to every input element, e.g.:
    <label for="username">Username</label>
    <input id="username" type="text" />
    Setting the value of the input can now be done via:
    await $('aria/Username').setValue('foobar')
  4. Less ideal but still working are placeholder or aria-placeholder properties:
    <input placeholder="Your Username" type="text" />
    Which can now be used to fetch elements as well:
    await $('aria/Your Username').setValue('foobar')
  5. Furthermore if an image tag provides a certain alternative text, this can be used to query that element as well, e.g.:
    <img alt="A warm sommer night" src="..." />
    Such an image can be now fetched via:
    await $('aria/A warm sommer night').getTagName() // outputs "img"
  6. Lastly, if no proper accessibility name can be derived, it is computed by its accumulated text, e.g.:
    <h1>Welcome!</h1>
    Such a heading tag can be now fetched via:
    await $('aria/Welcome!').getTagName() // outputs "h1"

As you can see, there are a variety of ways to define the accessibility name of an element. Many of the browser debugging tools provide handy accessibility features that help you to find the proper name of the element:

Getting Accessibility Name in Chrome DevTools

For more information check out the Chrome DevTools or Firefox Accessibility Inspector docs.

Accessibility is not only a powerful tool to create an inclusive web, it can also help you write stable and readable tests. While you should not go ahead and give every element an aria-label, this new selector can help you build web applications with accessibility in mind so that writing e2e tests for it later on will become much easier.

Thanks for reading!

Welcome! How can I help?

WebdriverIO AI Copilot